Pages

Sunday, December 18, 2011

Gingerbread Cupcakes

Gingerbread Cupcakes
with Cinnamon Cream Cheese Frosting


Hello hello! Well its a week until Christmas, exciting! I cannot wait to see my niece open her presents this year! I'm guessing she'll be thrilled for about 3 minutes and then be done. But, it will be the cutest 3 minutes ever! She's been literally hooked on that classic Rudolf movie lately so she will most likely want sit down and zone into that. We'll see, either way I'm excited.

I'm thinking of making waffles for breakfast too. With my oh so beautiful, early Christmas present, kitchen aid hand mixer. I get way too excited about kitchen appliances, but I just can't help it.

Anyways, onto a delicious cupcake recipe perfect for this time of year! I was selling cupcakes, and taking orders at this local holiday craft fair and wanted a few festive flavors for cupcakes. I kept debating between eggnog, chocolate peppermint, and gingerbread. I feel like people who like eggnog LOVE eggnog but there aren't many of them and since I already had a chocolate cupcake I went with gingerbread.


The cupcakes are great and the frosting is amazing! They are a lot more like actually gingerbread than a cupcake so I want to experiment with this but still delicious. The strong ginger with the spices and molasses goes great with cream cheese frosting. They are a little dense (perhaps because it used THREE sticks of butter lol) but not too heavy at all. Delish!

If you enjoy gingerbread in cookie or actual bread form you will enjoy these too!

Enjoy!
Gingerbread Cupcakes

Ingredients
  • 1 1/2 cups all-purpose flour                                       
  • 2 tablespoons ground ginger
  • 2 teaspoons ground cinnamon
  • 1/4 teaspoon ground cloves
  • 1/4 teaspoon ground nutmeg
  • 1 1/2 cups unsalted butter (3 sticks), room temperature
  • 1 1/2 cups sugar
  • 3 tablespoons unsulphered molasses
  • 4 large eggs, room temperature
  • 1 teaspoon vanilla extract


Cinnamon Cream Cheese Icing

Ingreidents
  • 8 ounces cream cheese, softened
  • 1 stick unsalted butter, room temperature
  • 3 cups powdered sugar
  • 2 teaspoons vanilla extract
  • 3 teaspoons cinnamon (you can you less, I prefer a lot of cinnamon flavor)

Directions
For the Cupcakes:
  1. Preheat oven to 350 degrees and line muffin pan with baking cup liners.
  2.  In a large bowl, sift together flour and spices; set aside.
  3.  In a seperate
  4. Beat in the molasses until incorporated. Followed by the eggs, one at a time. Then the vanilla.
  5. Add flour and mix on low speed until just combined.
  6. Fill the cupcake tins three-quarters full and bake until a toothpick inserted in the center of them comes out clean, about 30 minutes. 
  7. Cool on a wire rack in tins for 10 minutes, then transfer cupcakes to a wire rack to cool completely.
For the Frosting:
  1. In a large bowl beat the butter and cream cheese until combined.
  2. Add the vanilla.
  3. Add the cinnamon until fully incorporated.
  4. Gradually add the powder sugar by sifting in 1 cup at a time and mixing until fully incorporated. 
Spread or pipe frosting onto cooled cupcakes. Top with mini gingerbread men and/or women if you wish :).


Thursday, December 15, 2011

Weekend in the Concrete Jungle, Christmas Time in NYC

Christmas Time In NYC
FYI-its a long post, hope you're up for a good read :)


Hello Hello! It's getting closer and closer to the holidays! You know what that means. More and more cookies! My house usually has much more this time of year but I have been CRAZY busy these past few months that most of the cookies here, actually all of them, are not one's I made.

Anyways. I do not have a lovely Christmas cookie recipe today. My apologies but I was away enjoying myself in New York City! What a better place to be around Christmas right??!

I was hoping to run into Buddy the Elf! I think it should be required  that Will Ferrel goes into character and roam the city around this time of year. How awesome would that be!? Haha I seriously LOVE that movie.
I also think New York should be required to play Christmas music out on the sidewalks through out the city. Just some suggestions. I sent a letter to the Mayor, we'll see what he says :).

Well, let me tell you why I was in New York in the first place. A long lost friend of mine from across the pond, England for those of you not familiar with the phrase, was visiting. Chris and I met while volunteering on a game reserve in South Africa. He has been spending a while traveling around Africa and New Zealand (must be nice to not have to work for a year) and made a stop in NYC on his way back to London. So of course we planned on meeting up.

 I was excited to be a tourist through association. You know when you hate looking like one in a place you are familiar with but feel it's OK when you are accompanying a tourist. We did so much, most walking. Which was killer being that Chris is like 8ft tall (more like 6ft 6 or something like that, still ridiculously tall lol), and I am only a whopping 5ft 1. I was basically sprinting while he strolled along.

Regardless we did it all. Central Park, where we strolled past the skating rink, which we never got around to doing, and stopped by Strawberry Fields. We also strolled down to that Famous Fountain by the water where people can rent row boats and be all romantic. Speaking of being romantic. We witness an engagement at this fountain. This one lacked the romantic factor and ranked high in the awkward factor, lol poor girl. I won't go into detail but word of advise to the fella's. When proposing don't walk away from your new fiance, all I'm saying.

We then headed down to St. Patrick's Cathedral where we came across something quite peculiar. Maybe we were just being overly critical but we still thought it was funny that in their nativity scene they had the usual but then perched in the back was a statue of a golden retriever dog, collar and all. Hmmmmmm. Not going to say much more about that just that I had never seen a family pet joining in at the birth of Christ.

We then foolishly made our way over to Rockefeller center to see the tree. It was JAMMED packed and literally impossible to move as a single person. It was more like we were all one big ball of people moving with each other. It was amusing to listen and watch the people around. No one was in the holiday spirit like myself. Where was Buddy the Elf when you need him  most?! People were literally yelling at each as if they purposely were crowding them. It was unavoidable people, get over it. One man freaked out on an old lady because she walked into his picture. When i say freaked out I mean he used some harsh language and a loud scary voice.


On that note we left and headed back to our awesome room's in Brooklyn. It was a remodeled loft in a very funky, artsy neighborhood. The next few days were spent at a n Art Museum which required you to sign a wavier incase of injury, pretty awsome, eating creat city grub like fries from Pomme Frites, and also at NY Rangers game where we had 9 dollar beers and enjoyed the game from the last row. Still we had a BLAST! And it was such an exciting game.

We also visited the 9/11 memorial which is going to be absolutely beautiful once everything is complete. They have two remembrance pools laid where each of the twin towers was originally located. The pools are set in the ground and you look down into it where waterfalls flow over and into a deeper pool and then a smaller square in the center. It sounds so peaceful and is really beautiful.  Around each fountain is the names of all those who lost their lives. It's organized by groups so its easy for a friend and family member to find someones name. It was so sad to see all the names and to just reminisce about 9/11. It was also crazy to think how long its been and how much work is still being done. If you want to check out more information of visiting the memorial you can go to the website here.


 After seeing the memorial we walked from there to Battery Park to view Lady Liberty. From there we
walked up to South Street Seaport, and then got lost trying to find the Brooklyn Bridge, go figure.We could obviously see it but we were trying to get to the part where you can walk on to get to Brooklyn and well it took us longer to walk to the entrance then it did to actually cross the bridge. Oh well. It was well worth it.


The walk across was pretty awesome. It wasn't too
crowded, too windy, or too long. It was perfect! Beautiful views and just pretty cool to be walking across. We then go to Brooklyn and made our way to a pretty park with a "beach" and view of Manhattan.


Then we chowed down on the Famous Grinaldi's Pizza.
Well first I got my head bit off because I didn't know the line was outside. But hey I should know better than to upset an Italian New Yorker right lol? So after waiting for a few minutes we squeezed and ordered a large, yes a large for two people. We asked fro roasted peppers and ricotta as our extra toppings. Now this pizza was pretty great. However, maybe I was expect SO MUCH more and was a tad let down. Our crust was a little to limp and soggy for my liking. This was most likely just because they have  10lbs of cheese on top lol. Regardless it was still delicious and we ate almost all of it.


That was pretty much the end of our trip as I was leaving to come back to work, blah. We did have an awesome time both sight seeing during the day and partying around town at night. I hope you did not fall asleep because in a few days I will be posting some AWESOME Christmas cupcake recipes.

HAPPY HOLIDAYS! Reminder from Buddy: The best way to spend Christmas cheer is singing loud for all to hear! Go on belt a carol or two! :)

Monday, December 5, 2011

Ooo Lah Lah

Red Velvet Cupcakes
with white chocolate cream cheese frosting


Is it me or is everyone CRAZY about red velvet?! How could you not be, right? I mean it's a smooth and rich cake with that classic cream cheese icing. It's hard to find a really good REAL red velvet cake though. Many bakeries tend to just go crazy with the bright red flavor and it lacks that hint of chocolate. The best red velvet cakes I've actually every had, have been from local supermarket bakery sections.

For those of you who think the boxed cake mix for red velvet is amazing, wait until you try this recipe. Many might think that red velvet is too much of a process, but its really not all that bad. And the end result is well worth it!

I also amped up the frosting by adding white chocolate to it. The white chocolate with the tangy cream cheese just makes it that much better. It's my favorite frosting, ever. I save any left over and just eat it plain i love it that much!

The holidays are coming up and these red velvet cupcakes will be perfectly festive. You could get fancy with some holiday decorations or festive sprinkles. Go ahead and give these a try, they won't last long!


Red Velvet Cupcakes

Ingredients
  • 2 1/2 cups sifted cake flour
  • 1 teaspoon baking powder
  • 1 teaspoon salt
  • 2 tablespoons unsweetened cocoa powder
  • 2 oz. red food coloring (two bottles)
  • 1/2 cup unsalted butter, softened
  • 1 1/2 cups sugar
  • 2 eggs, at room temperature
  • 1 teaspoon vanilla extract
  • 1 cup buttermilk, at room temperature
  • 1 teaspoon white vinegar
  • 1 teaspoon baking soda
 Directions
  1. Preheat oven to 350 degrees. Line two 12-cup muffin tins with cupcake papers.
  2. Sift together the cake flour, baking powder, and salt into a medium bowl; set aside. 
  3. In a small bowl, mix food coloring and cocoa powder to form a thin paste without lumps; set aside.
  4. In a large bowl, using a hand mixer or stand mixer, beat butter and sugar together until light and fluffy, about three minutes. 
  5. Then add the eggs, one at a time.
  6. Followed by the vanilla and the red cocoa paste, scraping sides of bowl as needed.
  7. Add one third of the flour mixture to the butter mixture, and mix until well combined, then half of the buttermilk.
  8. Beat in another third of flour mixture, then second half of buttermilk. End with the last third of the flour mixture, and mix until well combined, scrape down the bowl with a spatula to get everything mixed in.
  9. In a small bowl, mix vinegar and baking soda. It is supposed to fizz.
  10. Add vinegar mixture to the cake batter and stir well to combine.
  11. Fill cupcake cups with about 3/4 full.  
  12. Bake for approximately 20-22 minutes, rotating pans halfway through, until toothpick comes out clean(mine were finished baking at around 18 minutes).
  13. Cool the cupcakes in their tins on a wire rack for 10 minutes then remove and allow to cool completely before frosting. 
White Chocolate Cream Cheese Frosting


Ingredients
  • 1 8oz package of cream cheese, at room temperature.
  • 1 stick of butter (1/2 a cup), at room temperature.
  • 1 teaspoon vanilla
  • 4oz white chocolate
  • 3-4 cups powdered sugar, sifted
Directions
  1. To melt the chocolate: break into small even pieces and place in a microwave safe dish. Heat for 30 seconds and stir. Remain heating at 15 second intervals, stirring in between, until fully melted. Let cool for a few minutes.
  2. In a large bowl with an electric mixer, beat the the cream cheese and butter together until combined, about 2 minutes.
  3. Add the vanilla and mix to incorporate.
  4. Add the cooled melted chocolate and mix to incorporate.
  5. Gradually add the sugar, 1 cup at a time through a sifter, and mix until well combined. Add the amount of your liking. I generally add 3 cups so its no overly sweet.
  6. Spread or pipe onto cooled cupcakes.
some of them I smoothed the frosting on and rolled in sprinkles :)

ENJOY!

Sunday, December 4, 2011

Quick and Easy

Creamy Parmesan Risotto with Chorizo and Asparagus


Hello, Hello! Happy Sunday! How was everyone week?! If you are over here on the east coast I hope you are all still taking advantage of this amazing weather we are still having! It's so crazy, but I am NOT complaining in any way. I am such a baby when it comes to being cold so I am really trying to do as much as I can outside before I freeze my toes off.

Anyways, I have been cooking and baking quite a bit lately but I haven't had the chance to take pictures or post about them so hopefully that will change and I will be more of stickler with my camera and get snapping. I'd really like to practice taking really nice shots with what I make. That being said, please excuse the horribly focused and lighted pictures used to show this dish. The camera on my cell phone just does not do this dish justice. IT IS AMAZINGLY DELICIOUS!

I had some chorizo left over from this venison chili I made for my pops and wanted to use it somehow. So i rummaged through the cabinets and fridge and came up with this. It's really simple because the risotto is made by cheating and from a box. I have made risotto before and well, this taste just as good and is much easier!

I LOVE Lundburg's. It is quick and easy and has the amazing smooth and creamy texture of real risotto. I shouldn't say real. I guess this is real risotto just made in a simpler method :).

 Before I make the rice, I saute the chorizo that I took out of the casing in a little bit of olive oil until nice and brown. I mash it a little with a wood spoon to get nice bit size pieces. Then remove them from the pan and cooked the rice in the same pan to pick up all the flavor of the chroizo. ( MMM! I'm getting excited thinking about this!) I steamed the asparagus in the microwave covered with plastic wrap for a quick 2 minutes and chopped it and tossed it with the chorizo back into the risotto once that was finished cooking.

The whole this takes about 30 minutes max and is quite an impressive side dish to any meal. Obviously It would accompany certain foods better than others. However a friend of mine made this with an Asian stir fry and heck it was just as great!


I hope you enjoy! Check back soon for my red velvet cupcakes! :)


Creamy Parmesan Risotto
w/chorizo & asparagus
  • 1 box Lundburg's Creamy Parmesan Risotto                                            
  • 1 1/2 tablespoons olive oil
  • Splash of white wine, or chicken stock
  • 2 1/2 cups of water
  • 2 chorizo sausage links, removed from casing and chopped finely
  • 6-8 asparagus stalks, bottoms removed

  1. In  a medium pot, or large saucepan pour 1 tablespoon of olive oil and heat over medium-high. Add the chopped chorizo and saute until nice and brown.
  2. Remove and let sit on plate with a paper towel.
  3. In the same pot, add a splash of white wine and scrape the bottom of the pan to lift all of the flavor.
  4. Mix the flavor packet with 2 1/2 cups of water.
  5. Add 1/2 a tablespoon of olive oil and pour the packet of rice into the pot.
  6. Saute for a minute or two, tossing it in the olive oil and allowing it to pick up the chorizo flavor.
  7. Pour the water and seasoning mixture into the pot stirring the rice.
  8. Bring to a boil then reduce heat to low simmer for 20 minutes, stirring occasionally.
  9. While simmering the rice, set asparagus in a microwave safe dish with a splash of water and cover with plastic wrap.
  10. Microwave for 2 minutes, less or more depending on size of asparagus. Let sit for a 1 minute and remove plastic wrap and set on paper towel.
  11. Once cool chop into small pieces and set aside.
  12. Once rice has absorbed most of the liquid, around 20 minutes, stir in chorizo and asparagus and remove from heat.
Try not to eat the whole thing yourself. It's that good!

Wednesday, November 30, 2011

Plain Jane, or just Plain Delicious

Vanilla Vanilla Cupcakes


You know the reputation vanilla gets for being plain, well I'm not sure why because who doesn't like vanilla?! So why not double the delicious flavor and make it even better? I may be a bit biased because I always prefer vanilla but I guarantee you will too once you try these cupcakes.

I made these for a friend who order a batch for their office. They wanted a REALLY good vanilla cupcake. I was going to get creative with the icing but wanted to really show up how wonderful vanilla is. So I went with a basic vanilla buttercream. The cupcake however was a bit different. I wanted a cupcake that had a lighter texture but HUGE vanilla flavor.

I did my research for the best vanilla cupcake. I found that the ones with the best reviews all had a different method of how they add the butter. They don't cream the butter and sugars together instead they mix it into the flour to make little crumbles before adding in the wet ingredients. It is a very thin batter but rises a lot which makes it light but not too light. I am in love with this recipe and I think I am going to use this as my go to vanilla recipe. I found several I really likes but this one from The Cupcake Project is my favorite so far.

So these are my Not So Plain Jane Vanilla Cupcakes.

Enjoy!


Vanilla Vanilla Cupcakes
Adapted from The Cupcake Project

  • 1 cup granulated sugar
  • 1 vanilla bean (I skipped this and doubled the vanilla extract later)
  • 1 3/4 cupcakes cake flour, not self rising
  • 1 1/2 teaspoons baking powder
  • 1/2 teaspoon baking soda
  • 1/2 teaspoon salt
  • 1/4 cup butter, room temperature
  • 2 large eggs, room temperature
  • 1/3 cup full fat sour cream
  • 1/4 cup vegetable oil
  • 1 tablespoon pure vanilla extract ( I used two because I did not have the vanilla bean)
  • 2/3 cup whole milk
  1. Preheat oven to 350 F.
  2. If using vanilla bean:  combine sugar and seeds from the vanilla bean.Using the back of a spoon, move around the bowl and apply pressure to break up any clumps of seeds and to better infuse the vanilla flavor into the sugar. Set aside.
  3. If not skip this and just set 1 cup of sugar aside.
  4. With electric mixer, mix together cake flour, baking powder, baking soda, and salt.
  5. Add the vanilla bean sugar/sugar and mix until well combined.
  6. Add butter and mix on medium-low speed for three minutes.  (Because there is so little butter, you'll end up with a very fine crumb texture,)
  7. In a small mixing bowl, whisk together eggs, sour cream, oil, and vanilla extract until smooth.
  8. Add the egg mixture to the flour mixture and beat on medium speed until just combined.
  9. Slowly add milk and mix on low speed until just combined.  The batter will be liquid. 
  10. Fill cupcake liners just over 1/2 full.
  11. Bake for 14 minutes and then test to see if they are done, with a toothpick.
  12. Remove them immediately from the tins and leave them on a cooling rack to cool.

Basic Vanilla Buttercream

1/2 cup unsalted butter, room temperature
3-4 cups confectioners sugar ( I tend to only use 3)
1-2 teaspoons pure vanilla extract ( sometimes I use the clear vanilla so it doesn't alter the color, but I don't get the vanilla flavor I'm looking for)
1/4 cup milk

  1. With an electric mixer, cream butter until smooth and creamy, 2 to 3 minutes.
  2. With mixer on low speed, gradually sugar, milk, and vanilla; mix until light and fluffy.
  3. Add more sugar and/or milk to your liking.

Sunday, November 27, 2011

My Holiday Cookie List


Holiday Cookie Checklist

Hello, Hello!  I hope everyone had a lovely holiday!

I had been meaning to post a recipe for these white chocolate truffle cupcakes I recently made, however they were all eaten before I had a chance to snap a picture. So, although it may say something about how great they were I decided to wait and post it when I remake them as dark chocolate truffle cupcakes. However if you are aching to see the recipe you can check it out HERE.

Anyways, I have been doing dessert research like its nobodies business lately. I feel like I am on the computer and in my baking and cooking books and magazines all day everyday debating what to bake through out this holiday season.

It was getting CRAZY. I literally have like 300 new saved bookmarks, 1000 folded pages, and endless lists of what I want to make and bake. So I decided to make smaller lists and separate them into categories. My first list is the holiday cookie list.

This time of year just screams cookies, and I wanted to make a list of the cookies I would like to make this year. Not your normal chocolate chip, sugar, or spritz cookies though. As scrumptious as they are, I really wanted to get creative and make unique cookies that you don't see everyday.

So I have made a list of the top cookies I want to bake from now until New Years. This gives me a little more than a month to eat AS MANY COOKIES AS POSSIBLE! Then by next year I won't even be able to look at a cookie and start the year off healthy.

Oh, if only that were true. Well here is my cookie list. I linked them to the blog I found them off of so you can check them out before I make them. If you have any wonderful cookie suggestions please feel free to share!

P.S. Let's all say a prayer, make a wish, or send out some love to mother nature to keep this AMAZING November weather around! I will allow snow Christmas Eve, and New Years Day. But until nothing below 60 degree's will be acceptable. THANKS! :)


   Salted Mudslide Cookies        


Don't they look amazing!? Should keep me busy for a while, can't wait to try these!
Check back and see how they come out!


Wednesday, November 23, 2011

Thank goodness for giving thanks!

Chocolate Pumpkin Spice Bundt Cake
w/ cinnamon glaze


Well hello! Long time no blog! So much going on in life right now, but I am back today with a GREAT recipe just in time for tomorrow's day of thanks! One last Pumpkin recipe before we are all on pumpkin overload.

Since it is Thanksgiving I would just like make a list of just some of the things I am thankful for:

  • First and foremost, THE MOST AMAZING LITTLE BOOGER IN THE WORLD, my niece Kayleigh!
  • My AMAZING friends! 


  • Cupcakes!


  • CAFFEINE!


  • The opportunities I've had to travel the world!
  • Art. Painting, like baking and cooking, is therapy to me.
  • & Wonderful organizations that truly do make a difference, whether big or small. It's good to know there are people out there whose passion is to better the life of someone else.


  • I could keep listing all the things I am thankful for but I don't want to get too carried away :). I have this great recipe to share with you. You will love it so much that you might add it to your list of what you are thankful for!

    Its the perfect change up from your typical Thanksgiving desserts. It is almost a blend of them all into one great cake. You have the flavors of the most popular Turkey Day Pies! Pumpkin, chocolate, and cinnamon & spice (from an apple pie). This is also a pretty big cake so there is PLENTY to share and leftover for getting all sugared up for BLACK FRIDAY SHOPPING!!!

    I haven't decided if I am going yet or not. My family and I decided to just get one gift for one other person this year since most of us children are battling student loan debt (blah!), so I really have no need to join crazies and go shopping, but wouldn't mind taking part in the madness. We'll see :).

    Anyway I hope you all have a WONDERFUL and sweet Thanksgiving with those you love and take a moment to realize how lucky you are and to focus on whats good (&great) in the world!

    *I am also SO VERY THANKFUL that you take time to read my blog, it means so much to me. Thank you!<3*

    MMMM SOOO GOOD! It's not too sweet or heavy, just perfect!
    
    Chocolate Pumpkin Bundt Cake
    with cinnamon glaze
    Adapted from Eating Well Magazine

    Ingredients for the Cake:
    • 1¾ cups all-purpose flour
    • 1 cup granulated sugar
    • ¾ cup unsweetened cocoa powder
    • 1½ teaspoons baking powder
    • 1½ teaspoons baking soda
    • ½ teaspoon cinnamon
    • 1/8 teaspoon allspice
    • 1/8 teaspoon nutmeg
    • ¼ teaspoon salt
    • 1 cup buttermilk (or you can sub in 1 cup of milk whisked with 1 tablespoon lemon juice, this is what I did)
    • 15-oz can of  pumpkin puree
    • ¾-cup light brown sugar, packed
    • 1 large egg, room temp
    • 1 egg white, room temp
    • ¼ cup canola oil, I used veg oil because it's what I had.
    • ¼ cup honey
    • 1 tablespoon pure vanilla extract
    Ingredients for the Glaze:
    • 2/3-cup confectioner’s sugar
    • 1 tablespoon cinnamon
    • 1½ tablespoons milk
    Directions
    1. Preheat the oven to 350 degrees. Coat a 12-cup Bundt pan with cooking spray.
    2. Sift the flour, granulated sugar, cocoa, baking powder, baking soda, spices and salt in a medium bowl.
    3. In separate bowl, whisk the buttermilk, pumpkin puree and brown sugar.
    4. Add in the eggs one at a time.
    5. Stir in the oil, honey and vanilla. Gradually add the dry ingredients, stirring until just combined. Transfer the batter to the prepared pan.
    6. Bake the cake until a wooden skewer inserted in the center comes out with only a few moist crumbs attached- about 1 hour. Let cool on a wire rack for 15 minutes. Remove from the pan and let cool completely on the rack, about 1 hour.

    Glaze: Beat the confectioner’s sugar, milk and cinnamon with an electric mixer until completely smooth. Once the cake is cool, place it on a serving plate and drizzle the glaze over top. Slice and serve.
    

    Saturday, November 12, 2011

    Point, shoot, eat!

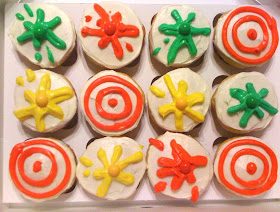
    Paintball Themed Cupcakes
    Vanilla cupcakes with Vanilla Cream Cheese Icing

    I could have used a little more practice decorating lol
    Hello, Hello! How is everyone doing this Monday?! I hope everyone had a much better week last week than myself.

     I  had quite the week, let me tell you...ughhhh. I won't drag ya down with the details but I will tell you how scary it is to hit a deer. Not just a little deer but a MASSIVE buck. I have lived in the woods my whole life and have never hit a deer. And I will be having nightmares forever because of this!
    Anyways, at least I'm safe and no serious injuries. The same cannot be said for my little car.
    
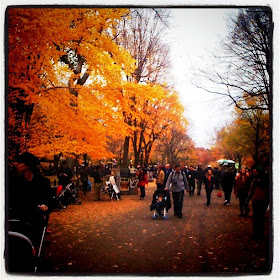
    But I had a much better weekend filled with family and fun! It was my great Aunt's 80th Surprise Birthday party, and boy was she surprised! I wish I had taken pictures because it was so lovely to see family I don't ever get to see and to see how surprised my aunt was. I blame the wine for making me miss the photo ops lol. And Sunday was just as wonderful! I spent the day with my sister in NYC strolling through beautiful Central Park and went ice skating at Bryant Park later that night.

    Me in Central Park
    
    
    Central Park. How pretty are the trees?!
     Speaking of better things, whats better then a good old fashion vanilla cupcake? A friend of mine asked me to make cupcakes for her brothers birthday. I asked her what he liked and she said paintball, and all things boys. As soon as I heard paintball I knew what I wanted to do.

    I thought of paint splatters and targets. I looked online for some inspiration and found an awesome cupcake cake where you pull apart the cupcakes which are lined up and decorated as one big cake. It had this great white background with a giant red target and random paint splatters. I was planning on this, but then had too much to take care of being that I am working on getting my car fixed, finding a car to drive and all that jazz.

    So instead I just made some vanilla cream cheese frosting and saved some to color for the decorating.
    I had originally planned on getting really elaborated with some gum paste decorating and fondant targets but again, that deer took all my time.

    These ended up being quite simple. The longest part was mixing the icing into the colors and putting in the pastry bags. After frosting the cupcakes with the non-colored vanilla icing I used the colored icing to make the paint splatters and targets. Then places matching Gobstopper candies to put in the center of the paint splatter. The designs are easier than they look, you can practice on some paper or a plate first.

    Here is a simple yet delicious vanilla cupcake recipe and an even simpler vanilla cream cheese icing recipe.
    These will be perfect for any boy, or teen boy, or even just skip the the decorating and have some delicious vanilla vanilla cupcakes!
     <3Enjoy!
    In my lovely boxes from BakeABox.com
    Vanilla Cupcakes
    adapted from Brown Eyed Baker
    • 1½ cups all-purpose flour
    • 1 cup granulated sugar
    • 1½ teaspoons baking powder
    • ½ teaspoon table salt
    • 1 stick unsalted butter, room temperature
    • ½ cup sour cream
    • 1 large egg , room temperature
    • 2 large egg yolks , room temperature
    • 1½ teaspoons vanilla extract
    1. Preheat oven to 325 degrees & line cupcake pan with paper liners.
    2. Sift  together flour, sugar, baking powder, and salt in  mixing bowl.
    3. Beat together butter and sour cream for a few seconds, then egg, followed by the egg yolks and vanilla. B
    4. Add to flour mixture and beat at medium speed until smooth, about 1 minute.
    5. Divide batter evenly among cups of prepared tin (I use a 1/4 cup measuring cup).
    6. Bake until cupcake tops are pale gold and toothpick comes out clean, about 20 minutes.
    7. Remove the cupcakes and let cool in pan 5 minutes before removing to a wire rack to cool completely. 

    Vanilla Cream Cheese Icing

    • 1 stick unsalted butter, room temp
    • 6oz cream cheese, room temp
    • 1 teaspoon vanilla
    • 2-3 cups powder sugar
    1. Beat butter and cream cheese together until blended and fluffy.
    2. Add vanilla.
    3. Sift in powder sugar 1 cup at a time mixing completely each time.
    4. Taste as you go and adjust amount of sugar to your liking. If it gets too think a drop or two of milk will help thin it out.
    To decorate:
    • Food coloring of your choice, I love these Wilton ones!
    • 1 package of Wonka Gobstoppers
    1. Spread a layer of the icing over each cupcake using a small flat spatula to create a nice smooth surface.
    2. With remaining icing separate into separate, smaller bowls.
    3. Add coloring of your choice to each bowl, If doing target's I recommend using red. For paint splatters, any colors are great!
    4. Once colors are mixed, scoop into small pastry bags with small rounded tip fitted. OR use small sand which baggies and cut a small snip in the bottom corner once the bag is filled.

    To make targets:
     Using red colored icing, simply make one large circle around the outer edge of the frosted cupcake, followed by a smaller one inside of that circle. Finish with a dot in the middle of the cupcake.

    To make paint splatters:
    Using color of your choice start in the center of the cupcake and going outwards from there make lines of varied lengths.
    Place a matching colored gobstopper in the middle of the lines.
    *The best way to do this is to just use a picture as a reference and try to recreate it*


    Monday, November 7, 2011

    Fancy Schmancy Oatmeal Cookies

    Happy Monday everyone! Hope you all had a lovely weekend :). I had a pretty fantastic weekend. I enjoyed a girls night out with way too much alcohol and dancing, it was blast. Saturday was also pretty great. I went to Philadelphia to watch the Flyers, where we enjoyed the game from a suite. It was unusually FREEZING, but still a great time. And Sunday my newly engaged twin sister and a few friends went wedding dress shopping. It was crazy to see her in wedding dresses but very exciting at the same time! I think she found "the one"!!! We shall see though, its still pretty early to decide.

    Anyways I have a bunch of cupcake orders this week (yay!), but I still felt like baking. I wanted something easy and classic so I went with the good old oatmeal cookie.  However I decided to amp it up a bit. I toasted the oats to give them a deeper, almost nutty flavor. I also browned the butter, which ALWAYS impresses me. I skipped the raisins and added a little extra sugar to up the sweetness because  of the sea salt I sprinkled on top.

    Sweet and salty is an under statement for this extremely flavorful cookie. Its more than just sweet and salty. It's rich, toasty, nutty, and warm. Yes i used warm to describe the flavor. But it really is a "warm" cookie. Between the toasted oats, browned butter, and brown sugar it really has layer on layer of flavor that make you feel warm....and happy of course!

    This cookie is literally a step above any other, and extremely addicting. You cannot just have one. You have been warned. 

    These would also be a great cookie for the holiday season coming up (it's November already, how did that happen?!!). Perfect for holiday dinners, parties, or cookie exchanges. Or hey who are we kidding, they are perfect for yourself and just because! I hope you try these, they are well worth the few extra steps.


    Fancy Schmancy Oatmeal Cookies

    Ingredients
    • 1 3/4 sticks (14 tbsp) butter-I used salted
    • 1 1/4 cup old fashioned oats
    • 1 1/4 cup firmly packed brown sugar
    • 1 egg
    • 2 tsp vanilla
    • 1 1/2 cups flour- i used bread flour for a chewier texture
    • 1/2 tsp baking soda
    • 1 tablespoon sea salt
    Directions
    1. Preheat the oven to 350.
    2. Spread the oats on a parchment lined cookie sheet and toast until lightly browned, stirring every few minutes to prevent from burning. 
    3. Remove and set aside.
    4. Sift (or whisk) the flour and baking soda in a medium bowl and set aside.
    5. Place the butter in a medium saucepan over medium heat. Cook, stirring frequently, until light brown. (It will bubble and foam first then clear up a bit before turning brown very quickly.) Remove from heat and let cool before pouring into a large mixing bowl.
    6. Beat in the vanilla and egg, then add the oats.
    7. Then the flour mixture, until well combined.
    8. Drop spoonfuls of dough on to parchment lined cookie sheets (you can spray with non stick but it may burn the bottoms slightly).
    9. Sprinkle sea salt on top of each cookie.
    10. Bake for 8-10 minutes, cool for 1-2 minutes on cookie sheet before moving to a cooling/wire rack. 

    Enjoy with a nice big cup of coffee, or cold glass of milk. 
    You can try to resist the urge to not eat another one, but you will fail miserably. Like I said before, you have been warned on how addicting these are :). 


    Wednesday, November 2, 2011

    An Elephant Never Forgets....

    An amazing act of kindness and passion from an amazing and passionate person.


    So, I have this pretty awesome friend. Her name is Halley Martinez and her and I both have a huge passion for making a positive impact and doing our part in making a difference in this world. She naturally has a giving and kind heart with a taste for experiencing the world all the while doing what she can to make change possible.

    releasing a rescued seal!
    She has quite the list of accomplishments, such as moving to the Dominican Republic to teach English, help build homes, donate clothes and food, and she even raised money to purchase a cow (which she got to pick up and deliver herself!) for a family who really needed support in building a stable income and being able to supply food to themselves and their community. She also works hard on doing the little things that count too. She will only eat sustainable fish and chooses not to eat out at restaurants which do not support this. She has also given up red meat due to the harmful effects on the animals and humans alike from mass production. She even works for The Marine Mammal Stranding Center, a non-profit organization focused on rescuing and rehabilitating marine mammals for the entire state of New Jersey. I could keep going on about the amazing things she does but the reason I am writing this post is to share the project she is working on right now.

    She has just arrived in beautiful Chiang Mai, Thailand to work at The Elephant Nature Park with The Elephant Nature Foundation.. This park is focused on rescuing Elephants from their commercial and tourism use through out the country, as well orphaned and injured elephants. Anyone who knows me knows my passion for elephants so I am SUPER excited for Halley and what she gets to take part in at the park. You can visit their website (both linked above) to get more information on the work the park does as well as information for visiting and volunteering at the park.


    Due to the massive flooding through out Thailand right now Halley will also be traveling out of the park to help rescue other animals stranded and in need of help. How awesome is that?!  I cannot wait to hear from her and have an update on the progress of how it is going. For now I will continue to keep my fingers crossed for her safe travels!
    I am sharing this with you because I hope to insipre you to find what you are passionate about and to go and do it! I  also help this causes you to pay ir forward as they say and do something positive! Get out there and change the world! <3

    Monday, October 31, 2011

    Happy Halloweenie!!!!

    Dark Chocolate Chocolate Chip Whooppie Pie's
    w/ Pumpkin Cream Cheese Filling

    look at the lil devil! he wasn't loving the costume

    Happy Halloween! Who doesn't love this holiday?! Seriously I don't know anyone, and if they don't well then they have yet to overdose on candy, wear as little clothes as possible and call it a costume, or be scared out of their pants. They just don't know what they are missing. And how can you hate those classic "Horror" films? I cannot get enough of them.

    So in spirit of this haunted holiday I wanted to make something that would be just as great as any piece of trick or treating candy. I found this recipe over at one of my favorite blogs, SugarPlum, and made them literally right after I read the post. I have to admit I lost a few whoopie pies because I didn't remember to spray the cookie sheet with non stick spray, so I lost about 4 whoppie pies but I still ended up with about 10 even though her recipe said I would only get ten whoppie pies total.

    I bet you if Micheal Myers showed up to my door I could distract him with these. We could both sit down with a big glass of milk and our whoopie pies and watch the endless marathon of Halloween movies.

    If you are at home handing out Halloween Candy to Trick-or-Treater's these are also a great snack for you. It will keep you from eating straight from the candy bowl :).

    Anyways these are delicious. Super light and fluffy with a delicious sweet filling with a great hint of cinnamon. And again, my sister still has my camera so since I'm cool now and have an IPhone I downloaded a pretty cool app that lets me edit my pictures to look all vintage-ie.

    Enjoy!

    Ingredients

    Whoopie Pies
    • 1/2 cup unsalted butter, softened
    • 1 1/4 cups granulated sugar
    • 1 large egg
    • 1 cup buttermilk
    • 1 teaspoon vanilla extract
    • 3/4 cup unsweetened cocoa powder
    • 1 1/2 teaspoons baking soda
    • 1/2 teaspoon baking powder
    • 1/2 teaspoon salt
    • 1 3/4 cups all-purpose flour
    • 4 oz dark chocolate, chopped finely (optional)

    Pumpkin Filling
    • 4 ounces cream cheese, softened3 tablespoons unsalted butter, softened
    • 1/3 cup canned pumpkin puree
    • 2 cups confectioners' sugar
    • 3/4 teaspoon ground cinnamon
    • 1/2 teaspoon vanilla extract
    Directions
    1. Heat oven to 400 degrees and spray cookie sheets with non stick spray.
    2. Using a sharp serrated knife finely chop the dark chocolate.
    3. In a large mixing bowl, using a mixer on medium speed, beat together butter and sugar until creamy.
    4. Add in egg, buttermilk and vanilla until combined.
    5. Add in the cocoa powder, baking soda, baking powder and salt until well combined.
    6. Reduce mixer speed to low; beat in flour until just combined.
    7. Fold in chopped dark chocolate.
    8.  Drop rounded spoonfuls of dough onto cookie sheets.
    9. Bake 8 minutes or until set and slightly crisp and cool 2 minutes before transferring cookies to cooling racks.  
    Pumpkin Filling:
    1. In a large mixing bowl, beat together cream cheese, butter, pumpkin, confectioners' sugar, cinnamon and vanilla until well combined and creamy.
    2. Fill cookies with pumpkin filling by spooning filling onto the bottom side of one cookie and topping with another pressing down slightly.
    
    isn't she the absolute most adorable trick or treater, ever?!