Tuesday, July 31, 2012

Sweet as Honey

Pin It


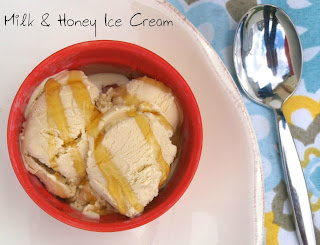
....Or what I like to call CRAZY AMAZING SUPER DELICIOUS ice cream. MMM if only there was an even better name to call this. This ice cream has got to be the best homemade, no best ice cream period, I have had in quite some time.

It has very few ingredients but is so flavorful! The blend of milk and honey are perfectly sweet. It has a silky smooth texture from being churned in the ice cream make. MMM MMM MMM. Seriously I cannot get enough. I am very impressed.

I found the recipe over at The Hungry Mouse, a new blog I found (with step by step instructions on literally everything she makes), and wanted to try it right away. I was intrigued by the use of honey instead of sugar because honey has a much deeper flavor and less intense sweetness than pure sugar. I did change a few things though.

To lighten it up, just a tad, I used half and half instead of heavy cream, and 1% milk instead of whole milk. Even with the changes it came out incredibly smooth and still creamy so I can't imagine how heavenly it must be with the full fat milk and cream.

There really isn't much else to say about this except how ridiculously great it is. So if you have an ice cream maker I HIGHLY  recommend trying this. If not, its worth buying one for lol :).

Well I have to go eat more ice cream, it's calling my name.


Enjoy!

Milk and Honey Ice Cream
Adapted from The Hungry Mouse
Makes about 1 quart
Ingredients
  • 6 egg yolks
  • 2 cups half and half
  • 1 cup 1%  milk
  • 1/4 cup honey
  • 2 Tablespoons vanilla extract

*Ice cream maker
*Candy thermometer
*Mesh strainer

Directions
  1. Separate the eggs. Placing the yolks into a large bowl. Save the whites for up to 1 day, make an omelet for breakfast with them :).
  2. Beat egg yolks well and set aside.
  3. Put the heavy cream and milk in a medium-sized, heavy-bottomed pot.
  4. Set the pot on the stove over medium heat, stirring occasionally, until it just starts to steam and bubble at the edges. Don’t let it boil.
  5. While waiting for the milk to heat up, pour the honey into a large bowl and set aside.
  6. Fill a bigger bowl with ice and set aside. This is going to be your ice bath to cool the heated mixture so you want the smaller bowl to fit inside the bowl with the ice.
  7. Place your strainer on top the bowl with the honey.
  8. Once milk mixture is heated remove from heat. Using a ladle, SLOWLY drizzle the milk mixture into the beaten egg yolks, while whisking continuously. You want to temper the eggs, bring the temperature up with out cooking them and getting scrambled eggs. So doing this slowly and whisking at the same time is important.
  9. Continue to do this until the majority of the milk mixture is whisked into the yolks. The pour yolk and milk mixture back into the pot and place back on the stove.
  10. Attach your candy thermometer to the pot but do not let it touch the bottom or you will not get an accurate reading.
  11. Heat over medium heat until mixture reaches 170, stirring occasionally.
  12. Once it reaches 170, instantly remove from heat and pour through the strainer into the bowl with honey. This will catch any cooked pieces of egg.
  13. Whisk to incorporate honey and follow with the vanilla.
  14. Pour into a container, press plastic wrap onto the top of the mixture, and let chill in the fridge for 4-6 hours, yes you need some patience.
  15. Once fully chilled and thickened, churn in ice cream machine according to that machines directions.
  16. Enjoy right away for a soft serve texture, then place in a freezer safe container and let set over night.
  17. Invite people over because you will want to eat he whole thing! 
Sunday, July 22, 2012

Pin It
Crazy Simple yet Crazy Delicious Cocoa Brownies


Hello hello! I was thinking of throwing another blueberry recipe at you but how does chocolate sound instead?

Good? Keep reading. No good? Well then go find something else to do, although I do not recommend that but the choice is yours :).

This recipe is coming to you from my roommate who is not only my partner in crime but my ever ready taste tester. She is always ready to try any and everything I come up with. So it goes with out saying that I taste whatever she makes as well.

Well I came home pretty late from babysitting and saw these brownies sitting on the stove and dove right in. MMM MMM MMM!

I was honestly surprised how great they tasted. Now, that's not because I don't trust her baking and cooking. It was mainly because they were not as dark as your typical brownie. They had a lighter brown color to them, so I was expecting a light chocolate flavor and a cake like texture.

Well don't judge a book by its cover and don't judge a brownie by its color. These were dense and fudge like with out being too heavy. And they chocolate flavor was stronger than it looked which was balanced nice by adding a little extra vanilla. Again MMM MMM MMM!

So the next morning I asked her what recipe she used. She basically looked up brownies online and took the first recipe she thought was easy enough. Literally only needs, butter, sugar, cocoa powder, eggs, vanilla and flour. You can go ahead and chocolate chips or walnuts or whatever you like in your brownies, but these cannot be easier. No melting chocolate or anything just mixing and baking.

If you are looking for a quick fix, of chocolate, get to baking and enjoy!


  • 4 large eggs
  • 1 cup sugar, sifted
  • 1 cup brown sugar, sifted
  • 8 ounces melted butter
  • 11/4 cups cocoa, sifted
  • 2 teaspoons vanilla extract
  • 1/2 cup flour, sifted
  • 1/2 teaspoon kosher salt
  • Directions
    1. Preheat the oven to 300 degrees F. Grease an 8x8 or 9x13 baking dish.
    2. In a large bowl or stand mixer fitted with a whisk attachment, beat the eggs at medium speed until fluffy and light yellow.
    3. Add both sugars.
    4. Add remaining ingredients, and mix to combine.
    5. Pour the batter into prepared dish and bake 45 minutes or until toothpick inserted in the center comes out clean.
    6. Let cool, or try to, before cutting into squares.

    Wednesday, July 18, 2012

    Ice Ice Baby

    Pin It
    Blueberry and Cream Popsicles


    Hello hello! I don't know how it is for you, but here its HOT HOT HOT! I'm pretty sure this has been the hottest summer here on the  (south) Jersey Shore in quite a long time.

    Thank goodness for the wonderful ocean always calling my name! And thank goodness for ice cream! Now I have never been an ice cream fanatic, regardless of my giant sweet tooth. However, this summer I feel like I have been eating buckets of the stuff. So I thought I need to get back to using that oh so wonderful ice cream maker my lovely friends had bought for me!

    I was going to go all gourmet and make a salted caramel ice cream, but when I opened my refrigerator I changed my mind. I saw my left over blueberry sauce from those amazing blueberry cheesecake cupcakes I made recently. So I thought hmmm I can defiantly make a super simple blueberry ice cream. 

    Then I got to thinking even more. Do I really need to have a gallon of ice cream sitting in my freezer for me to devour?
    Need, no. Want, yes.

    So to save my butt from growing I decided to make Popsicles instead. Such a thinker, aren't I?

    These turned out perfect, and seriously could no be easier. Even if you don't have left over blueberry sauce, that only take minutes to make.

    Once the sauce is made you simple make a separate cream base of heavy whipping cream, half and half, sugar and vanilla. Viola!

    Easy as that! This recipe can make up to 6 pops but feel free to adjust it to make more because you won't want just one :).

    Enjoy & stay cool!

    Blueberry Cream Pop's
    makes 4-6 popsicles

    Ingredients
    • 1 cup blueberry sauce, recipe found here
    • 3/4 cup heavy cream
    • 1/4 cup half and half (or more heavy cream)
    • 1/2-1 cup powdered sugar (adjust to your sweetness level)
    • 1/4 teaspoon vanilla extract
    *A popsicle kit is great but you can use small paper cups and popsicle sticks as well*

    Directions
    1. In a large bowl, whisk together cream, half and half, vanilla, and sugar until sugar is dissolved.
    2. Spoon some of the cream mixture into each of the popsicle containers, or cups, filling just the bottom.
    3. Spoon some of the blueberry sauce on top of cream mixture.
    4. Continue to do this until popsicle container is filled and top with popsicle top/stick.
    5. If using paper cups let the pop's freeze slightly before inserting popsicle stick.
    6. Let freeze for 6-8 hours before enjoying.


    Sunday, July 15, 2012

    Blueberry Cheesecake Cupcakes

    Pin It

    Hello Strangers! Yet again I have let this lovely place lack in new posts. But I am coming back with not just a great recipe but an AMAZING new cupcake!

    These pretty little things are Blueberry Cheesecake Cupcakes. Sounds phenomenal right?

    
    They look phenomenal too, don't they?!
    
    They are light and airy vanilla cupcakes filled with a blueberry sauce that is made with honey instead of sugar, and topped with a cream cheese  frosting. A great summer cupcake, especially here in South Jersey where blueberries are as fresh as you can get!

    I also got fancy and used colored icing swirled with white icing. I think this is my new favorite way of frosting cupcakes. I could look at them all day they just look so great!
    To make the swirl is actually very simple. A great tutorial can be found HERE. It is also quite a great blog as well. If you haven't checked it out yet, you should.

    I filled the cupcakes by using a small pairing knife to cut a circle into the top of the cupcake. Then I pulled the piece out and gently pressed down on the hole to make a little but more room for the filling. Next I spooned the cooled blueberry filling into the hole and topped with the piece I removed. Its very simple but if you want more detailed directions at Annie Eats, another blog I love following.


    I wish I had a good picture of the middle of the cupcake but I only have a blurry one taken from my cell but I will show you just to give you an idea of what the blueberry filling looked like. But I will post it at the bottom away from the prettier pictures, lol.

    Anyways, stop reading and go make these delectable cupcakes!

    my niece loves her cupcakes!
    Blueberry Cheesecake Cupcakes
    makes 12 cupcakes

    Vanilla Cupcakes
    Ingredients
    • 1/2 cup unsalted butter 
    • 1 egg
    • 2 egg yolks
    • 1 1/2 cups all purpose flour
    • 1 1/2 teaspoons baking powder
    • 1/4 teaspoon salt
    • 3/4 cup sugar
    • 1 teaspoon good quality vanilla extract
    • 1/2 cup whipping cream
    Directions
    • Preheat oven to 350 and place 12 cupcake liners in muffin tin.
    • Sift together flour, baking powder, and salt into a large bowl and set aside.
    • Beat butter with an electric mixer for 30 seconds. Add in sugar and beat until combined.
    • Add egg, and egg yolks one at a time until fully incorporated.
    • Add vanilla.
    • Add 1/3 of the flour mixture and beat until  just combined. Follow with half of the whipping cream. Repeat, and end with the last 1/3 of the flour mixture, beating until just combined.
    • Pour evenly (usually about 1/4 cup) into the muffin tin and back 15-18 minutes, until top is slightly golden and toothpick comes out clean.
    • Cool in tin for 5 minutes, then remove and let cool completely on a cooling rack.
    Blueberry Filling
    I used my go to blueberry sauce recipe used for these oatmeal bars and this frozen yogurt cake, mmm!
    • 1 2/3 cups blueberries
    • 3 tablespoons honey, or sugar but I prefer honey
    • 2 teaspoons cornstarch
    • A pinch of nutmeg
    • 1/4 teaspoon cinnamon
    • 2-3 teaspoons lemon juice 
    Directions
    1. Add all ingredients to a medium saucepan and bring to a boil.
    2. Reduce heat and stir constantly until sauce thickens, about 5-7 minutes.
    3. Remove from heat and set aside.
    *there will be plenty left over; perfect for ice cream or waffles*

    Cream Cheese Frosting
    *this makes quite a lot as well, but it's always great to have extra icing :)
    Ingredients
    1 8 oz package of cold cream cheese (not rock solid, but right out of the fridge is perfect)
    5 tablespoons of room temperature butter
    2 teaspoons vanilla extract
    2 cups powdered sugar
    *Blue food coloring for half of icing mixture

    Directions
    1. Sift 2 cups of powdered sugar into a large bowl and set aside.
    2. Beat cold cream cheese with butter and vanilla until combined, do not over mix or it will loosen and separate.
    3. Gradually add sifted sugar and beat until just combined. Add more until you reach the consistency and sweetness level you prefer.
    4. Scoop half of the frosting into a separate bowl and add enough blue food coloring until the color you want is achieved.
    5. Spoon the white frosting in a piping bag and the blue into another.
    6. Cut the ends and place into a larger pipping bag fitted with the tip of your choice. Make sure both ends are inserted into the tip or you will only get one color to come out.
    To Assemble Cupcakes
    1. Once cupcakes and filling have cooled, use a pairing knife to cut holes in the top of the cupcake.
    2. Trim the bottom off the piece you just removed from the cupcake, leaving just the flat top
    3. Spoon blueberry filling into the hole and replace the top of the cupcake.
    4. Pipe frosting onto cupcake in a large circular motion.
    *Again refer to these two sites for excellent step by step directions:

    <3ENJOY
     
     P.S. Here's a look at the filling