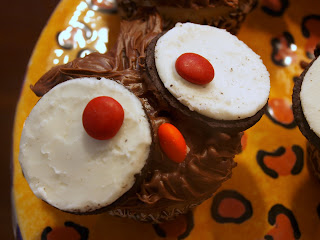
Super Simple Owl Cupcakes
First, HAPPY 1ST BIRTHDAY KAYLEIGH RAE!
Ok so this week, well past two weeks have been crazy! I have been on overload with things to do and just this week I started a new job and it is also my beautiful niece Kayleigh's first birthday! Now, this girl is the apple of my family's eye so this birthday is a BIG deal. But I believe she is seriously the cutest baby in the world and think she deserves it all! haha....seriously I do.
So for her birthday-which is the day after my dads (her pop pop) birthday (he'll most likely never be recognized on his birthday ever again now but lol come one did you see how cute she is!?)- I wanted to make something easy but festive/cute enough to celebrate the day. I remembered seeing a picture of owl cupcakes a while back and thought YES! That it what I'm going to make. I have no idea how but I will make them anyway!
Since I was super busy I cheated and used boxed cake and yes pre-made icing (i am usually so against pre-made icing but hey i was busy and Kayleigh didn't see to mind). For these cute little creatures all you really have to do is buy the ingredients and assemble. They are much easier than they appear. I just guessed on how they were assembled by checking out a picture and going from there and they came out great :)! People will love them I promise!
Directions
Any box cake flavor you prefer will work, just follow directions for making cupcakes and let cool.
1 jar of chocolate icing...unless you'd like some multi colored owls but chocolate looks the best, I think.
1 bag of cream filled chocolate cookies, oreo's as we know them.
1 large bag of m&m's
While cupcakes are baking, and cooling, split cookies in half and use the back of a butter nice to scrape excess crumbs off.
Dig out preferred m&m colors for eyes and noses. I thought brown looked the best for eyes but also threw in a few blue and red eyes for diversity :).
Find yourself enough yellow and/or orange m&m's for the noses
*note-here you can use the candy whole or use a sharp knife and cut in half. Both work fine but if using whole m&m push the candy into the cupcake itself just a bit or it will fall off of the icing.*
To make ears, use 6 left over oreo wafers- just the cookie part, scrape cream off- and cut into quarters (first in half and than in half again in the opposite direction).
Once cupcakes have cooled apply a layer of chocolate icing to the top of cupcake. Scoop and fill remaining icing into pastry bag or zip top bag (cutting a small hole in the bottom corner of bag)
Place two oreo's cream side up on the upper half of the cupcakes pressing down slightly. You may need to add a little extra icing to the back of cookie first.
Next add an m&m on each eye with the m facing down. Also place one below eyes for the nose.
Take the quartered cookie's and place in between and above the eyes, with rounded side facing each other) pressing down into cupcake slightly.
Using pastry bag, or zip lock, lightly make lines with remaining icing above eyes and over ears. You can also do this below the nose for some added umph ( yes umph)
Then look in amazement at the adorable little creatures you created!
I know this seems like a lot of steps but its actually extremely easy to assemble. Just keep referring back to the picture at the top and go from there.
I am going to leave you all with a few pictures that is worth more than a thousand words! Enjoy!
 |
| mmmmmmm cake |


No comments:
Post a Comment