Wednesday, September 28, 2011

Rainy Day Grub

Pin It
Spicy Tomato Soup w/ Cheesy Pesto Flat bread


Hey hey! So, all my 609 friends, who is ready for some nicer weather?! My umbrella and I have gotten much too close lately. If its not raining or drizzling it seems like its just about to at any moment. The humidity is doing wonders on my ever so frizzy hair but other I can't complain about getting to wear boots again! Not that you all care about my hair and wardrobe so I won't bore you with anymore of that.
Instead I'll entice you with some recipes to make for these rainy days that make you just crave good old comfort food.
This soup is a perfect way to lift your spirits and warm your soul! Ok, ok maybe I'm being extreme but it will hit that comfort food craving and heat ya up because it has a great spicy kick to it. I based this recipe off of one from Giada De Larentis.
I love her. I wish she was my neighbor. I'd always be out of sugar  so I could walk on over and be like "Oh hey neighbor, I'm out of sugar can I borrow some?" And she would say "Of course come in Ashley. I've actually been making this glorious dinner and have no one to share it with."
AHHHH I can dream right?
Annnnyyywwaaayyys. This soup tastes great, can be adjusted to your liking and is super simple. To make this she actually mixes chicken broth with a jar of really good marinara sauce. Who would have thought?!
The flat bread is basically pizza dough which I rolled out super thin and baked in the oven on a pizza stone. You can use premade pizza dough, make your own, or even just use some good Italian bread sliced into thin pieces.
Hope you try this one!
I will leave you with some California Sun, I bet it's not raining there!
if you look close enough, you can see me in the spoon!
Spicy Tomato Soup
Serves 4-6

3 tablespoons olive oil
2 carrots peeled and chopped
1 small onion, chopped
1 clove garlic, minced
1 (26-ounce) jar favorite marinara sauce
2 (14-ounce) cans chicken broth 
1/2- 1 teaspoon crushed red pepper
1/2 cup any small pasta
Salt & Pepper to taste

Directions
  1. Warm the olive oil in a large soup pot over medium-high heat.
  2. Add the carrots, onion, and garlic and saute until soft, about 2 minutes.
  3. Add the jar of marinara sauce, chicken broth, red pepper flakes, pasta, salt and pepper.
  4. Simmer for 10 minutes. Ladle into bowls and serve.
  5. In separate pot bring pasta to a boil for time indicated on box.
  6. Keep separate from pasta and add to each bowl rather than the pot of soup. This helps keep the soup at a great consistency with out the pasta soaking up most of the liquid, especially if letting the soup sit or not eating it right away.
Cheesy Pesto Flat bread


Prepared pizza dough
Garlic powder
Salt
1/2 cup Premade or homemade Pesto
1 cup shredded cheese, preferably provolone, mozzarella, or gruyere.

  1. Preheat Oven to 400 degrees
  2. If you have a pizza stone keep this in the oven while it preheats.
  3. Check out how I make homemade Pizza dough  <OR> use premade dough at room temp, and rolled as thin as you can get.
  4. Sprinkle dough with garlic powder and Salt.
  5. Place on preheated pizza stone, or cookie sheet.
  6. Bake for 5-7 minutes and remove from oven.
  7. Spread pesto across dough and top with grated cheese.
  8. Bake for another 6-7 minutes.
  9. Remove and let cool slightly before slicing into pieces.
  10. Best when dunked into soup!

MMMM! Stay dry!


Monday, September 26, 2011

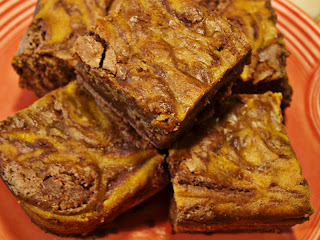
"Pumped" up brownies

Pin It
Pumpkin Brownies
I told ya to check back for some glorious fall recipes and this one will not disappoint. I know all the rage right now is APPLES, APPLES, APPLES, and though I actually do have an apple a day, I wanted to try something new.
If you asked me a few years ago, I would have said I don't like pumpkin. However, times have changed and so have my taste buds. I started to like it in tiny little increments. I first made these pumpkin cinnamon rolls, a great Pillsbury recipe, and LOVED them. They had just a hint of pumpkin flavor with a ton of cinnamon that they were hard not like. I than had a piece of pumpkin spice walnut bread and thought hmmm, maybe I'm catching on to this pumpkin thing. Then I just kept going, trying everything pumpkin. Waffles, pancakes, muffins, cake, even pasta. I can now say I am sold on pumpkin.
mmm perfect with some pumpkin spice coffee
So because of this and my new excitement for fall I decided to make these pumpkin brownies. Its not a super fudge type brownie, and I kind of wish they were. I wish I used more chocolate and made them just a little more richer and dense.
Regardless the pumpkin and chocolate make a wonderful match!


Pumpkin Chocolate Swirl Brownies
Makes 16
* 1 stick unsalted butter
* 6 ounces bittersweet chocolate, chopped
* 2 cups all-purpose flour
* 1 teaspoon baking powder
* 1/2 teaspoon salt
* 1 3/4 cups sugar
* 4 large eggs
* 1 tablespoon pure vanilla extract
* 1 1/4 cups solid-pack pumpkin
* 1/4 cup vegetable oil
* 1 teaspoon ground cinnamon
* 1/4 teaspoon ground nutmeg
Directions
1. Preheat oven to 350 degrees. Grease a 9-inch square baking pan or dish.
2. Melt chocolate and butter- Either: in a heatproof bowl set over a pan of simmering water, stirring
occasionally until smooth. Or in a microwave safe dish, heating in 30 second intervals and stirring until melted and smooth.
3. Whisk together flour, baking powder, and salt in a large bowl; set aside.
4.Beat sugar, eggs, and vanilla with an electric mixer until fluffy and well combined, 3 to 5 minutes.
5. Gradually beat in flour mixture.
6. Divide batter between two medium bowls (about 2 cups per bowl). Stir chocolate mixture
into one bowl. In the other, stir in pumpkin, oil, cinnamon, and nutmeg.
7.Transfer half ofchocolate batter to prepared pan. Top with half of pumpkin batter. Repeat to make one more chocolate layer and one more pumpkin layer.
8. With a small spatula or knife, gently swirl the two batters.
9. Bake 40 to 45 minutes and let cool in pan on a wire rack.

Optional step 10: Brew a nice hot mug of pumpkin spice coffee and season with half and half and sugar. Stir in cinnamon and nutmeg, or pumpkin pie spice if you have it. Top with whipped cream and enjoy!

<3 YUM
ps. a VERY exciting blog post coming VERY soon, yay!!!
p.s.s motivational monday will return next monday :) lol

Saturday, September 24, 2011

No recipe-recipe for cake balls

Pin It
Cookies and Cream Cake Balls
made w/ extra or left over cake

Hopefully you've all seen my post for my Oreo Birthday Cake, because these lil balls are the bite-size love child of that cake and some melted white chocolate. Well actually they are the orphan child who was left behind because they weren't used in the making of that awesome birthday cake, but who is really keeping track?
Anyways. I only made the cake into two layers by cutting one of the cakes in half instead of stacking each whole cake on top of each other. I didn't want to end up with a TON of left over cake that usually sits in the fridge while people have a tiny bit here and there and end up just throwing it out.
THROWING CAKE OUT IS NOT OK.
So i just went ahead and made it much smaller by only using the one cake cut in half and it was the perfect amount. Now what did I do with the other cake you ask?
I made these:


Look amazing right? Well they are.
I stuck with the cookies and cream flavor but you can use and flavor icing and topping you want.
Get crazy and creative, it will be fun.
So first I broke up the cake and crumbled into fine pieces. To do this is kind of stabbed in and swirled it with a fork and butter knife until it looked like so:

Then I scooped a little less than half of a jar of chocolate icing. Again use any flavor you prefer and adjust amount depending on how much cake you have. You need just enough so that when you mix it the crumbs start to form bigger clumps and the whole thing looks moist.

see how it's more clumpy and together now
Now you just form in to like size little balls by rolling them with your palms. I go ahead and dig in but you can use a tablespoon to scoop it out to make it easier to have similar sizes.


I set them on a parchment paper lined cookie sheet and placed them in the fridge while I crushed two Oreo cookies into tiny pieces and melted my white chocolate. I did this in the microwave with a Pyrex bowl. Set to 50% power or defrost and heat at 30 second intervals, stirring in between, until all melted.
There are several ways to go about dunking the cake balls into the melted chocolate. I find it easiest to just set it in and then using a mini rubber spatula gently twirl the cake ball until fully covered in chocolate. Then I use a fork to let the excess drip off when I scoop it out. Then set them on the same lined cookie sheet and sprinkle with cookie crumbs.
Once finished I like to let sit in the fridge for a few minutes to make sure they are all set.
Eat and share now, or save in an air tight container until you just can resist them anymore and dive right in!


If you didn't feel like reading all that:
Left over, or fresh cake crumbled finely.
1 jar of the icing of your choice
1 bag of melt aways of your choice, 16oz of prefer ed chocolate of your choice
A few Oreo cookies

  1. Once cake is crumbled finely mix in enough icing to bring  crumbs together and moisten.
  2. Crush two Oreo cookies in plastic baggie or in mini food processor.
  3. Form into like size balls by rolling with palms. Place on parchment lined cookie sheet and set in fridge while preparing chocolate.
  4. Melt chocolate in microwave in 30 second intervals or over a double boiler.
  5. Dip balls into melted chocolate and roll until fully covered. Remove with fork or tooth pick and set on lined cookie. Sprinkle with cookie crumbs and let set.
  6. Enjoy!

Friday, September 23, 2011

Milk's Favorite Cake

Pin It
Oreo Birthday Cake

Yay for cake! And yay for birthdays! Yes I am one of those people who LOVES birthdays. Nothing wrong with that, haters can hate. I have had to share my birthday with my twin sister my whole life (obviously) so maybe not knowing any different than always having to share a birthday enhanced my enthusiasm for birthday. What is so wrong with wanting to celebrate the day of someones birth and that they are still alive to enjoy it?
And what better way than with a delicious cake!
Well this is exactly what I like to do. I enjoy celebrating birthdays and I enjoy making birthday cakes. Deal with it. :)
It was my older sisters birthday Wednesday and so of course I wanted to make her a cake. But, as much as I love going all out with creative flavors she likes plain old yellow box cake with chocolate frosting.
Yeah, I wasn't going to make that, sorry Meg.
So I went with an oreo cake, since I knew she'd be ok with that being that she loves herself some oreos. This is a devils food cake with an oreo cream filling, and oreo buttercream/cream cheese frosting.
I kept debating between vanilla and chocolate for the cake base. But I'm glad I went with chocolate it makes more sense and really adds to the oreo concept and flavor.
 So happy birthday to my second mother and amazing big sister, Megan, or as she's known in my family Mother Meg.

I made my niece her own cupcake :)

Whimps Way Out:
 For two 8inch Cakes
1prepared box of your favorite chocolate cake
2 jars vanilla, cream cheese, or buttercream Icing
1/2 bag of oreo's, crushed

~OR!

From Scratch:
Devils Food cake
Adapted from SugarPlum

1 3/4 cups all-purpose flour
1/3 cup dark or regular unsweetened cocoa powder
1 1/2 teaspoons baking powder
1 teaspoon baking soda
1/2 teaspoon salt
1/2 cup oil
1/4 cup unsalted butter, softened
1 cup granulated sugar
1 teaspoon vanilla extract
3 large eggs
1 1/2 cup semi-sweet chocolate chips, 1 cup melted
1 cup buttermilk

  1. Preheat oven to 350 degrees F. Grease baking dish.
  2.  Sift together flour, cocoa powder, baking powder, baking soda and salt.
  3.  Beat oil, butter, sugar and vanilla on medium speed, until creamy, about 2 minutes.
  4. Beat in eggs, one at a time, until well combined.
  5.  Beat in melted chocolate chips.
  6.  Reduce mixer speed to low and beat in flour mixture, alternating with buttermilk, until well incorporated.
  7. Fold in remaining chocolate chips
  8. Divide batter evenly into two 8in baking dishes, (You can also make this a sheet cake or cupcakes)
  9.  Bake 30-35 minutes, or until a toothpick inserted into cake comes out with moist crumbs attached.
  10. Let cool for 5 minutes before transferring to cooling racks.
    • If you want several cake layers, let the cake cool completely or let sit in freezer for several minutes. Using a serrated bread knife and pressing down gently on the top of the cake, slowly slice through the cake going back a fourth with the knife.  Cut into the cake just a few times then turn cake and repeat. Do this until you have cut all the way around the cake. Run the knife all the way through the cake using the cuts you already made as a guide.
    • Gently remove excess crumbs.
    • You can also flatten the tops of each cake  to make them flatter and less rounded, by using the same knife and slowly cutting straight across at the lowest point of the rounded top.

Frosting
recipe by Me
1 stick unsalted butter, room temperature
8 ounces cream cheese, room temperature
3 cups powdered sugar
12-14 Oreo cookies, finely chopped (I uased my food processor)
1 teaspoon pure vanilla extract
  1. Whip cream cheese and butter until light and fluffy, 1-2 minutes.
  2. Mix in powdered sugar one cup at a time.
  3. Add vanilla extract.
  4. Separate about 1/3 of the icing into smaller bowl and stir in 1/3 of crushed oreos, and spread onto top of the bottom layer of the cake
  5. Place top layer gently down on top and spread entire cake with thin layer of some of the remaining plain icing.
  6. I like to place in fridge/freezer to let this layer stiffen slightly.
  7. Spread generous amount of remainging icing and smooth as much as possible.
  8. Sprinkle remaining oreo crumbs on side of cake and press into icing slightly if needed.
 Take this cake and go out there and enjoy some birthdays!


Wednesday, September 21, 2011

My Favorite Rice

Pin It
Salsa Rice


Hello, Hello! Before I get on to the recipe, I need to admit something.
I'm getting really really excited for fall!
 This is crazy, I am a summer girl through and through, but this year I am super anxious and excited now that Autumn has made its way around. I ended summer on a great note, with a fantastic birthday, but was hesitant and kinda bummed at the sudden change in weather. Well, tables have turned. I am enjoying the warm sun with the chilly breeze and since I have recently become a grandma and basically fall asleep before I get to my dinner, I don't mind that its dark so early. I used to HATE this, but hey it gives me time to catch up on sleep, and get in some extra blogging, hehe:).
I also have some exciting things coming up in the next few weeks, which just make fall all the more better! I will be selling my cupcakes at a HUGE pumpkin festival in town, I have most weekends free and will actually get in some great hiking, and I'm slowly becoming an acrobat! Yes that's right, but that's a story for a different day.
Oh, and this is PERFECT bonfire weather, which means S'MORES!!!!! And there's nothing like some good old Jersey S'mores:).
Oh and pumpkin beer! Another great addition to fall!
Ok, you get it, I'm excited about fall! But onto one of my go-to rice recipe.
This is one of my favorite recipes and I make it all the time. It is super easy yet super delish.
The hardest part is making the  brown rice, which you can use minute brown rice which makes it all the more easier.Although I have actually messed up minute rice in the past. Several times. Ooops.
To make this I just cook the rice with chicken stock and add whichever veggies I have on hand, with some good salsa, and sometimes sprinkle on some pepper jack, or sharp cheddar cheese on top.
Then viola! I loovvveeee this dish so usually make a giant bowl and use it as my meal, but you can use it as delish side.

cooking the peppers and onions while rice steams
Oh, by the way its super healthy, with vitamins from the veggies and fiber and protein from the brown rice. So don't feel guilty if you end up having several servings.
Well obviously I have yet to break my blabbing habit, so I will stop my hands from going on and on and leave you with the goods.
ENJOY!
My Favorite Rice
Serves 2-adjust according to servings needed
1 cup brown rice
1cup chicken stock, or water if this is a veggie meal
1/2 cup of your favorite salsa
1 cup of favorite mixed veggies
       *I tend to use peppers and onions either raw or sauteed, sometimes I'll throw in steamed broccoli and shredded carrots, like I said whichever I happen to have*
1 teaspoons of garlic powder and salt and pepper to taste.
1/4 cup shredded pepper jack/ sharp cheddar cheese, optional.
fresh cilantro, optional.

  • Cook rice in chicken broth according to directions.
  • While rice is cooking, prepare vegetables.
    •  If  using raw veggies, simply dice into small like size pieces.
    •  If cooking, cook to liking; steam, saute, boil.
  • Once rice is done mix in vegetables, salsa, garlic,salt and pepper.
  • Stir to incorporate, adding more salsa if desired.
  • Add fresh cilantro for added flavor
  • Top with cheese if you wish.

my future protege'


Monday, September 19, 2011

Motivational Monday!

Pin It
PRECAUTION: Today's post may be better enjoyed with a little background music by Smashin  Pumpkings. Click HERE to ensure this is achieved.


Well hello! You picked a great day to read this lil blog here!
Now, I know it's Monday. I know it's just the beginning of a long week, after quite a long weekend of getting a bit crazy right? Well maybe I am the only one, but I have to say I enjoy Monday's quite a bit.
 I wake up feeling super positive and try to motivate myself to keep that positive attitude for myself by sharing my thoughts with my best buddy Morgo .
She usually endures my SUPER early morning and way too chipper texts where I share my happy thoughts along with my pledge to eat healthy this week, get to the gym everyday, and swear I won't stress if things seem to never go easy.
Seriously, this happens almost every Monday, so be glad you are not Morgo and you did not receive a text this morning, but that you are graced with this lovely little tid bit which I hope lifts that droopy chin and brightens those tired eyes of yours and inspires you to go out and CHANGE THE WORLD!
Haha, if only I had that power!!!!
 But I do hope that you just take on the week a little happier, and stress a little less. Just go on thinking positive with whatever comes your way.
Pour yourself a cup of joe (where did that come from anyways, coffee=joe..?) and just take a few minutes before your crazy day to just sit back, relax, and smile knowing that you have a whole week to take in all the little things in life that we sometimes seem to over look or forget to appreciate.
 I know we all have our struggles, our ups and downs, but this week try and embrace everything you have going on in your life, good and bad, because you are luckier than you know, and more amazing than you think.
Remember what it is that make you happy and go out and do it!
Take a few minutes each day to really notice the little things that make you smile.
 Cheesey I know but what is so wrong with some positivity?!
I could go on and on and keep spitting out motivation quotes but I won't do that to you. So to whoever is still reading, SMILE! It's Monday!
If your positivity is beginning to diminish through out the week, here's a tip:
Try one of my yummy recipes, lol :)
Love you all<3
ohhh how I love new crayons

Wednesday, September 14, 2011

Muy Caliente

Pin It
Homemade Salsa Fresca

fresh veggies are absolutely beautiful
Chips are salsa are my go to food for everything! I can never get enough as a snack, with a meal, or with a delicious margarita! I'm not a huge fan of potato chips but give me some really good tortilla chips and I am a happy girl! I am actually quite the tortilla chip snob. I'm super picky about what brands and types I prefer to eat. However if the salsa is out of this world I could care less about what kind of chip I am dipping into it.

I eat a ton of salsa and love trying new flavors and different brands. I use it in a lot of different ways.
Its a great way to flavor rice, add some zing to chicken, or even on top of an omelet. The possibilities are endless!!!

Ok maybe I am little too excited about that, but what you should be excited about is how easy it is to make your own fresh salsa. This is defiantly not your mamma's jarred salsa. It is light and fresh with a great kick to it!

You should go ahead and make this next time you have some friends over. Once they try it they are going to say, "MMMMM this salsa is phenomenal, where did you get it?!"
You can simply reply, "Oh I just whipped that up before you got here."
Trust me they will be surprised. Not only because it tastes great but because most people don't usually think to make their own salsa. So it will be a tasty surprise!

Salsa Fresca
Makes about 2 cups.                                                            

2 large fresh ripe tomatoes, seeded and chopped
1/2 large onion, peeled and minced (i prefer red onion)
1/4 teaspoon minced garlic
1  jalapeño pepper, stemmed, seeded, and minced
1/4 cup chopped cilantro leaves
1 tablespoon fresh lime juice or half of one line
Salt and freshly ground pepper.

  • Combine all ingredients, taste and adjust seasoning as necessary.
  • Let the flavors marry for 15 minutes or so before serving, but serve within a couple of hours.

Try with these tortilla chips, they are my favorite!

Tuesday, September 13, 2011

Mambo Italiano

Pin It
Chicken & Pasta
w/garlic white wine sauce 


Hey hey! It's been a few days since I have posted anything. I had a lot going on. Nothing of too much importance just some work, work, and work. YAY!
But this past Saturday I spent with some close friends and Incubus! It was a great show and perfect weather for lawn seats! I had such a wonderful time, I even went ahead and got one of those WAY overpriced frozen drinks int he big plastic cups I said I'd never buy. Well now I can just check that off the list because it was a 16 dollar completely flavorless drink. But hey we had fun racing our way through it, bracing the brain freeze the whole way :)
we were too far for a pic of the band so we took one of ourselves
 Anyways....I have been on an Italian kick ever since I got bac
k from that glorious and delicious country. Who doesn't love Italian food right? But I have always just preferred other cuisines a little more and ate Italian much less than other foods. But lately I have just been loving pasta and cant eat enough pizza, or drink enough Italian red wine....mmmmm! So while I was driving around for work today I was contemplating what to eat for dinner and REALLY wanted pasta.  
I have some left over white wine, which I don't drink often so I thought what better way to use up than to cook with it. This calls for just a few things.  Just some chicken breast, garlic, chicken, broth, wine, olive oil, broccoli, and some parmesan. Make yourself a nice side salad and pour a glass of wine from the wine you cooked with and you're all set for quite a lovely date. No date?! No Problem?! Just add more wine to glass and I'm sure your lonely dinner date wont seem so lonely :).

 All kidding aside, it really is a delicious dish and great if you are just cooking for yourself or a large crowd. You just adjust the recipe easily depending on how much you need. I really wanted to make some cannoli cupcake poppers to go with these for desert but didn't get around to it. But I am making them asap and recipe will follow, mmm can't wait! :)


Chicken and Pasta

mmmmm cheese!

w/garlic white wine sauce
Serves 4, or 1 or 2 REALLY hungry people :)

 
4oz pasta (whichever you prefer, I used organic whole wheat spagetti)   
4 chicken breasts (boneless and skinless)
2 tablespoons flour
3 tablespoons olive oil
2 cloves garlic, minced
1/2 cup low sodium chicken broth
1/2 cup dry white wine
2-3 heads of broccoli
1 teaspoon dried parsley, prefer fresh if you have it (if using fresh, wait to add until the end)
1 teaspoon dried oregano
     *or whichever herbs you prefer*
1/4 cup freshly grated Parmesan
  • Cut chicken into even cubes, toss with flour, salt, and pepper.
  • Coat large skillet with olive oil and heat over medium heat.
  • Add the garlic and let cook for 1-2 minutes.
  • Place cubed chicken in skillet and saute for about 3-4 minutes, until browned.
  • Add the chicken broth, wine, and herbs.
    •  When adding the herbs, pour into palms and rub hands together when pouring it. It will help realize the flavor/
  • Cover and let simmer, for about 10-15 minutes.
  • While waiting prepare pasta and broccoli.
    •  I usually just cut the broccoli crowns off and place in microwaveable bowl. Add a few splashes of water and cover with paper towel, or microwaveable plate. Microwave for about 2-3minutes depending on how much broccoli you used. Used dish towel or oven mitts to remove from microwave, its HOT,  but broccoli comes out perfect every time, and super simple!
  • Once sauce has reduced and chicken has cooked through (about 10-15minutes) Toss with pasta, broccoli, and cheese.
  • Pour left over wine into glasses, and enjoy!

 Bon Apetito!


Tuesday, September 6, 2011

I Scream. You Scream. For my homemade ice cream!!!

Pin It

Cake Batter Ice Cream


So of course it figures now that I have the beautiful peice of machinery it gets crazy cold outside! I swear it went from summer to fall over night. What happened to our nice transition into cooler weather?! I was meant for warmth I cannot adjust this fast!
Regardless I am just as thrilled to get experimenting with my ice cream maker. So anyone who wants to be my taste tester please let me know! I have lots of ice cream and cupcakes coming up and need tasters because I can only eat so much, although i've learned its A LOT more than I thought I was capable of :).
   
So for my first attempt I really wanted to go all out and make a rich salted caramel ice cream, or strawberry cheesecake ice cream.
 But stopped myself, babysteps.

Instead I did this super simple, 5 ingredient, batch of ice cream.You can compare it Cold Stone Creamery if you must. However my inspirtation came from the flurry I got the other day at the custard stand. It was a cake batter flurry. I had it with vanilla custard and asked for sprinkles to be mixed it. I was picturing chunks of cake batter, I don't know why but I was. I guess I was thinking of brownie or cookie dough chunks. So I asked before I ordered.
Me: "So, the uh, cake batter in the flurry. What is that? Like chunks of cake batter?"
Ice cream girl: " UMMMMM No. Its cake mix added to the ice cream."
Me: "You mean like cake mix from a box?"
Ice cream girl: " Uh, yeah."
Me: "AHHH thats crazy I never would have thought of that! Can I get jimmies in too?!" (obviously way too excited)
Ice cream girl: "Uh if thats what you want." (obviously still annoyed and hating her job)
Well that was my insipiration. It tasted amazing! Although she did go a bit overboard on the cake mix and i literally had a spoonful  of just cake mix when I got to the bottom.
Ok so I  realize I tend to ramble on these posts, so I'll just move on to the recipe!
Oh! I also got super corny and scooped some ice cream into paper lined cupcake tins and put it back in the freezer. Just because it was cake batter ice cream and i love cupcakes lol:)


Adapted from Scoopalicious

1 cup half & half (I used whole milk)
3/4 cup sugar 
2 cups heavy cream 
1 teaspoon vanilla
1 cup cake mix (I used yellow)

Directions

Whisk the half & half and granulated sugar until the sugar is dissolved. Stir in the heavy cream and vanilla and then stir in cake mix (to avoid lumps sift in). Pour mixture into the freezer bowl and churn as directed by your machine. Remove ice cream from freezer bowl and place into a freezer proof container and freeze for 8-10 hours.


 I read up on some tips after the fact and I am going to try making ice creams in different ways to see which texture I like the best. I didn't freeze the bowl from my ice cream machine, apparently a CRUICIAL step, so I think it just spun around in the bowl for 30 minutes for no reason lol. But it did freeze overnight and still tasted great! So im guessing you can do this without a machine, not sure.
Let me know if you try with or without a machine! Or come over and I will make you some
<3

Sunday, September 4, 2011

A Quarter of a century calls for a celebration!

Pin It
Cupcake Poppers


LOVE THESE! I have a feeling these are going to be made quite a bit in the future. I am super excited about getting really creative with them. Using crazy colors and fancy flavors! I have already been making a list of flavors and colors I can make. Ok anyways, now that you know how excited I am about these let me tell you a bit more about these awesome little treats.
 Last week I crossed the bridge from 24-25, 25 CRAZY! I don't feel  25, I'm not really sure what it should feel like, but I feel happy and excited for what my next 25 years will bring (hopefully lots of cupcake poppers!) I have had an amazing past few years.

 From volunteering in Costa Rica w/my best buddy Morgan


Exploring the Caribbean


Working on a Game Reserve in South Africa
                              

Taking an Acrobat Class


Backpacking around California


Bouncing around Europe


Completing my first mud  run


haha yes i stole this picture
...& welcoming my oh so BEAUTIFUL niece


I am seriously so thankful to of had the opportunities I've had, the friends I have, and mi familia! Ok getting carried away again. On to the poppers!

Well in the spirit of my day of birth I was having a small bonfire to celebrate and wanted to originally make a cake. But then I thought hmm I have got to get kicking on my cupcake recipes. So cupcakes it was, until I saw these crazy little creations online. I was super excited about making these because they are perfect to just set out at parties for people to grab one, or several. No need to set out the cake and cut it or worry about making enough cupcakes. These are just great! You can literally just pop one in your mouth.

These are made by simply baking mini cupcakes, cutting the tops off, and sandwiching them between icing. I felt bad wasting the bottoms so I used those too. They weren't as "popper" like because they weren't round, but still looked great. I also used some as mini-mini cupcakes. Just topping with swirled icing. You could crumble up the batter and find a good recipe for cake pops too with the left overs.

I made these simple with a vanilla cake base and vanilla buttercream filling. I also pressed round sprinkles into the tops. This was not my original plan.

I tried to separate the batter into different bowls and add different colors to each. I was using an all natural gel food coloring which i never used before. Well I guess I just didn't use enough and they all mostly came out the same color as the original cake batter, oh well. lol I thought the sprinkles on top looked cute anyways.
Well my 25th birthday was AMAZING and filled with cupcakes, cupcake winery red velvet wine (SOOOO GOOD), bonfires, a hurricane, the beach, the best of company, & an amazing gift from my good friends Mr&Mrs. Martinez....a Cuisinart ice cream maker, AHHHHHHH ice cream recipes to come!

Cupcake Poppers


You can use a box cake mix here
          OR
1/2 cup unsalted butter, room temp
2/3 cup sugar
3 large eggs
1 1/4 teaspoon pure vanilla extract
1 1/2 cups a.p flour
1 1/2 teaspoons baking powder
1/4 teaspoon salt
1/4 cup whole milk
Food coloring of your choice


In the bowl of your electric mixer, or with a hand mixer, beat the butter and sugar until light and fluffy. Add the eggs, one at a time, beating well after each addition. Beat in the vanilla. 
In a separate bowl whisk together the flour, baking powder, and salt.
With the mixer on low speed, alternately add the flour mixture and milk, in three additions, beginning and ending with the flour. Scrape down the sides of the bowl as needed.
Vanilla Buttercream:


1 cup  unsalted butter, at room temperature
4 cups powdered sugar, sifted
1/8 teaspoon salt
2 tablespoons milk
2 teaspoons vanilla
food coloring of choice


  • In a bowl, with a mixer on low speed, beat butter, 2 cups powdered sugar, and the salt until blended. Add milk and vanilla; beat until blended. Add remaining powdered sugar, 1 cup at a time, beating until incorporated. Turn mixer to high speed and beat frosting until fluffy and smooth. ( you can add food coloring is you wish)


  • Directions:
    Heat oven to 350°F. Spray 60 mini muffin cups. Make cake batter as directed on box, or as directed above.


    Divide batter among 5 small bowls, about 3/4 cup each. Make 5 different colors of batter by adding 1/4 teaspoon food color to each bowl; blend well.

    Fill each muffin cup with 1 level measuring tablespoon batter, making 12 cupcakes of each color.

    Bake 10 to 12 minutes or until toothpick inserted in center comes out clean. Cool 5 minutes; remove from pan. Cool completely, about 10 minutes


    Assemble each popper using 2 mini cupcakes. Cut tops off each cupcake horizontally (save bottoms for another use/make more poppers). Spread or pipe about 1 tablespoon frosting on cut side of 1 cupcake top. Form a sandwich by placing cut side of second cupcake top on frosting; press lightly. Repeat with remaining cupcake tops.


    MMMM, Enjoy!


    mmmm perfect shot and chaser pair!